Terraform - First Steps on Hetzner Cloud
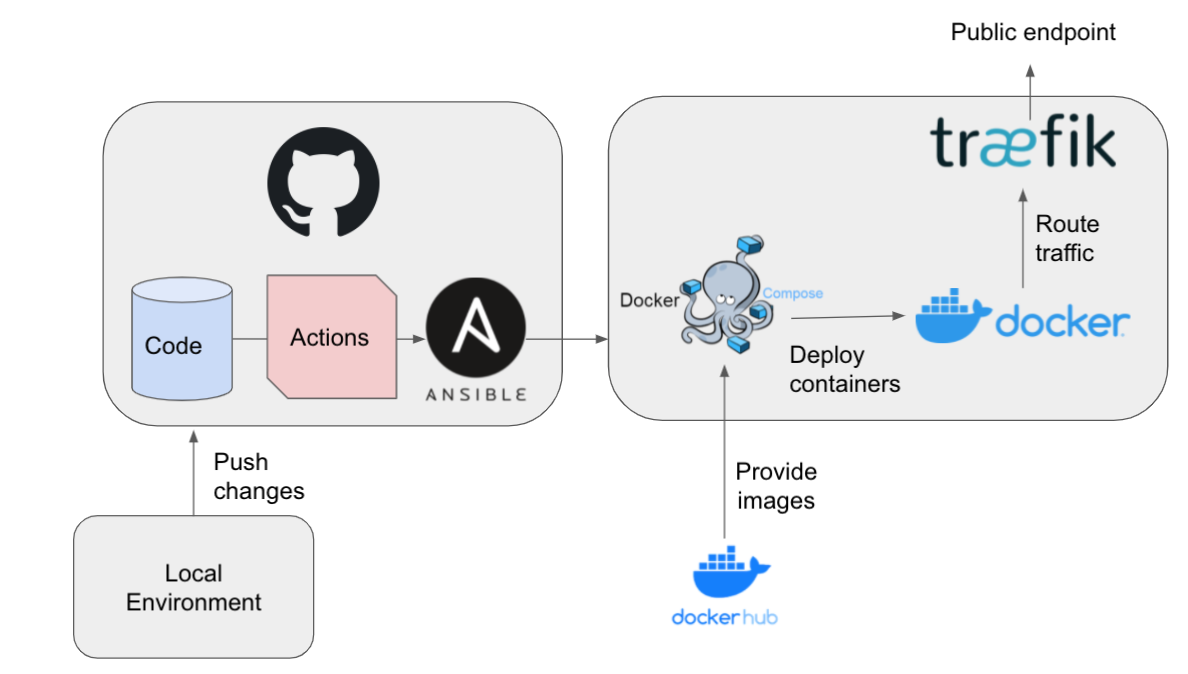
I use Ansible already for years to provision server instances and for subsequent CI/CD. A recent example is the Geonovum OGC API Testbed . Here (selective) Docker Containers are automatically deployed on GitHub pushes using Ansible called from within a GitHub Workflows.
Now investigating how Terraform could play a key role in (Cloud) infrastructure management. There is a small overlap between Ansible and Terraform but that is a matter of how they are applied in concert.
Ansible is more geared towards maintaining the OS and its running components e.g. Docker Containers on VM-instances. Terraform is more geared to maintaining a Cloud infrastructure, "in the large": acquiring VM-instances, networks, DNS. If you are familiar with AWS, Google Cloud Platform, or in our case Hetzner Cloud , it is what you can do by clicking in their respective UIs or via their APIs like Hetzner's hcloud . And btw: both Ansible and Terraform are Open Source.
Quote from random web-search : "Terraform is designed to provision different infrastructure components. Ansible is a configuration-management and application-deployment tool. It means that you'll use Terraform first to create, for example, a virtual machine and then use Ansible to install necessary applications on that machine."
Both Ansible and Terraform are "declarative", i.e. configuration-based, where the configuration describes a desired state. ctions are "idempotent", i.e. the same action can be applied multiple times, but when the desired state is reached it won't have effect.
As I plan to apply Terraform in other projects as well, I took a deep dive, following hands-on tutorials from the Terraform website. In a very short time I was amazed by Terraform's power and elegance! My ultimate goal was to manage (acquire, configure, access, destroy) the lifecycle of Hetzner Cloud Virtual Machines (VMs, VPS's). This all took about less than two hours, documenting my steps along the way.
I started at the Getting Started page. While there is a lot of stuff on AWS, Terraform Cloud, I basically stuck to these four steps. You may even skip the third (GCP) step. Important is to learn the terminology and config conventions.
- Installation
- Using Docker Provider
- Using GCP Provider
- Using Hetzner Cloud Provider
Tip: in IntelliJ IDEA install the Terraform plugin. It will recognise/help with Terraform files!
Step 1 - Installation
learn.hashicorp.com/tutorials/terraform/install-cli
On a Mac with Homebrew install the Terraform CLI:
1$ brew tap hashicorp/tap
2
3$ brew install hashicorp/tap/terraform
4
5$ terraform -version
6
7Terraform v1.0.2
8on darwin_amd64
That's it!
Step 2 - Using Docker Provider
learn.hashicorp.com/collections/terraform/docker-get-started
I started project dirs under ~/project/terraform/learn/.
1$ mkdir -p ~/project/terraform/learn/terraform-docker-container
Create a file called main.tf:
 1terraform {
 2  required_providers {
 3    docker = {
 4      source  = "kreuzwerker/docker"
 5      version = "~ 2.13.0"
 6    }
 7  }
 8}
 9
10provider "docker" {}
11
12resource "docker_image" "nginx" {
13  name         = "nginx:latest"
14  keep_locally = false
15}
16
17resource "docker_container" "nginx" {
18  image = docker_image.nginx.latest
19  name  = "tutorial"
20  ports {
21    internal = 80
22    external = 8000
23  }
24}
25
This defines that we will use the Terraform Provider plugin named "docker" with source kreuzwerker/docker . `Terraform has a registry of official (Provider) plugins.
Now initialize and install the plugin:
 1$ terraform init
 2
 3 **Initializing the backend...**
 4
 5 **Initializing provider plugins...**
 6
 7- Finding kreuzwerker/docker versions matching "~ 2.13.0"...
 8
 9- Installing kreuzwerker/docker v2.13.0...
10
11- Installed kreuzwerker/docker v2.13.0 (self-signed, key ID **24E54F214569A8A5**)
12
13. etc
14
You may validate your config:
1$ terraform validate
Moment of truth: create the resources:
1$ terraform apply
Verify the existence of the NGINX container by visiting localhost:8000 in your web browser or running docker ps to see the container.
That's it for Docker. Next is to use a real Cloud Provider.
Step 3 - Using GCP Provider
learn.hashicorp.com/collections/terraform/gcp-get-started
This was actually more elaborate than the Hetzner Cloud exercise. I had a GCP account, so this went smooth: first creating a Network and later a VM Instance. In this step also learned about using Terraform Providers, Resources, Variables(-files.) I leave this as an option and skip to Hetzner Cloud which is the goal of this post.
Step 4 - Using Hetzner Cloud Provider
The Hetzner Cloud plugin provider was not in the tutorials,
but it was still not too hard to extrapolate from Step 3,
from various Hetzner tutorials and from the hetznercloud/hcloud Terraform Provider.
Links:
- hcloud Provider: https://registry.terraform.io/providers/hetznercloud/hcloud/latest
- https://community.hetzner.com/tutorials/howto-hcloud-terraform
- https://maddevs.io/blog/terraform-hetzner/
- using TF-hcloud with Docker: github.com/insekticid/docker-terraform-hcloud-example
Prerequisite is to have a Hetzner Cloud account and thus login access to console.hetzner.cloud .
Steps:
- create a new Project in https://console.hetzner.cloud/projects, e.g.
TerraformLearn - add your SSH public key to this project via "Security" menu link left
- generate and copy an API Token for the project
My goal was to create a Debian VM, login there with root and SSH key and destroy it afterwards.
1$ mkdir -p ~/project/terraform/learn/terraform-hetzner
Create main.tf as follows:
 1terraform {
 2   required_providers {
 3     hcloud = {
 4       source  = "hetznercloud/hcloud"
 5       version = "1.27.2"
 6     }
 7   }
 8 }
 9
10 provider "hcloud" {
11   token = var.hcloud_token
12 }
13
14 resource "hcloud_server" "node1" {
15   name        = "node1"
16   image       = "debian-9"
17   server_type = "cx11"
18   ssh_keys = ["just@sunda.lan"]
19 }
20
Create a file variables.tf:
1 # Set the variable value in *.tfvars file
2 # or using the -var="hcloud_token=..." CLI option
3 variable "hcloud_token" {
4   sensitive = true # Requires terraform = 0.14
5 }
6
Then a file called terraform.tfvars.
This is a file with "secrets" normally not checked-in a repo but there are
many other possiblities to deal with secrets/credentials:
1 hcloud_token = "the token string from Hetzner Cloud API Token"
Moment of truth: apply!
1$ terraform init
2
3$ terraform apply -auto-approve
Using -auto-approve you skip the interactive approval-step.
Next check the Hetzner Cloud Console project page and see the new VM running!
Try to login on your new VM (IP may also be gotten from output.tf, another exercise):
1$ ssh root@<Your VM IP>
Then destroy your VM:
1$ terraform destroy -auto-approve`
There is much more one can do with the Hetzner Provider:
basically everything that is available in the console
UI and hcloud API: creating Volumes, managing networks,
adding SSH-keys, snapshots, using cloud-init etc.
See the manpage in particular the Resources drop-down menu:
registry.terraform.io/providers/hetznercloud/hcloud/latest/docs
Beware that some Terraform actions are destructive: e.g. upgrading the OS
will destroy the existing VM and create a new.
For those cases Floating IPs and auto-provisioning with Ansible will help.
But in that case Ansible would be more suited to upgrade the OS.
One can always execute terraform plan first to see the execution plan.
My recommendation is to let Terraform handle the basics, and have Ansible manage the details on VMs.
Alternatives: TF with DigitalOcean using the DO Provider: registry.terraform.io/providers/digitalocean/digitalocean/latest/docs .
All in all: Terraform can form a nice partnership with Ansible.